Showing posts with label signs. Show all posts

Thursday, June 12, 2014

Cabinet Door Sign

You know I am never done decorating,
 changing things and adding details.
Some time ago, I was traveling in Arkansas and stopped at a wonderful flea market and found these great cabinets doors for sale.

Not sure  where this flea market was, off the side of the road,
but those always seem to be the best stops.
Cabinet doors are perfect for signs, paintings and inspiration boards
with the frame built right in.
I sold many designed with paintings, French graphics and roses,
so I thought I would keep one for myself to place above my kitchen cabinets. An area I continue to work on and evolve over time.
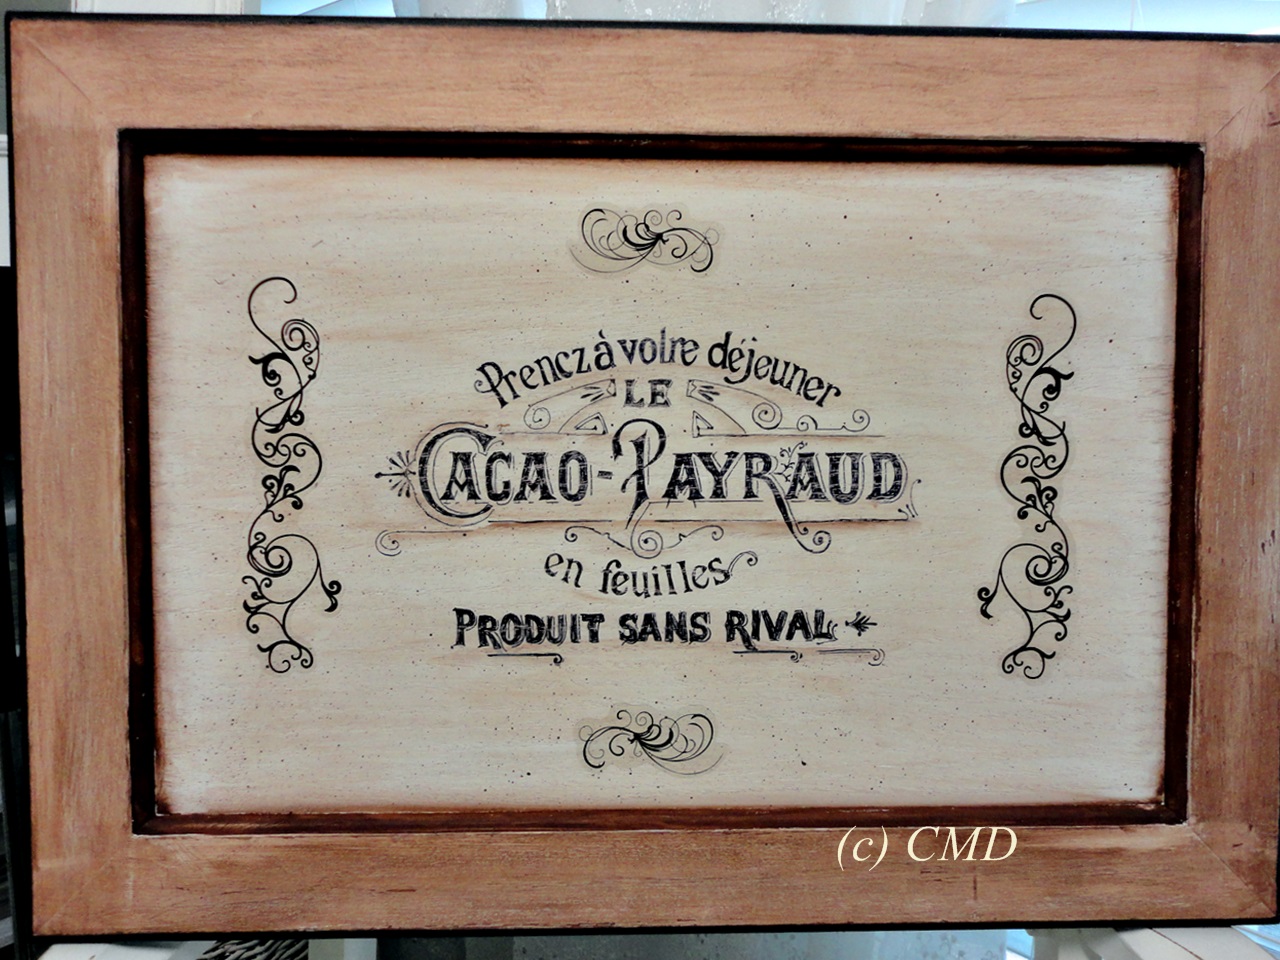
First, I painted this treasure a cottage white and added an enlarged
french graphic using the blender pen transfer method, shared HERE,
followed by filling in a bit to darken with a Sharpie Pen.
The graphic is courtesy of
Since this is to be displayed up high, it needed to be darker.
See the smaller graphic? ~ this antiqued version was the inspiration for the look, yet leaving it light enough to be seen from the floor.

Next I began to antique the background and darken the framed edge.

Using acrylic paint in burnt umber and water, working quickly and applying with a soft cloth.
You can apply an extender medium to the paint for a longer work time if you have never done this. All these supplies are inexpensive
and available at most craft centers.


The color goes right over the words and then I float a bit more
color around the high points and edges.
Sand for a bit of distress and age.


To the framed area I darkened it  with the umber
and added black to the edge.
I also had some scroll appliques in my stash,
so I added those to the sides and top of the graphic.


Here it is in the new spot above the cabinets in my kitchen.


From a plain cabinet door~


To a French Graphic Display Sign.


If you come across these doors, don't pass them up,
they are great to create with.

Happy Creating.

Celestina Marie


Continue Reading
35 comments
Share:

Friday, November 15, 2013

Dress Form Ornaments

A few days ago~
I shared these paper mache dress form ornaments
 as I began to create with them.
 
Aren't they cute?
I found them over the summer as I was checking out
from a shopping trip at Michael's.
 
They only had a few left.
Wish I could have gotten more.
Here's how they turned out.


These will be in my etsy shop, in sets of two.

 
Wait!!
Something is missing!!
 
Oh yes,
The glitter~~~~~lots of glitter!


That's better.

 
Beside these little cuties,
Here are a few more goodies going to the shop.
 
Signs to Ice Skates!
 
 
Large framed wood sign

 
Metal sign with my red velvet Christmas Roses and
I stenciled Noel and the fleur di lis.

 
This is an old roof slate
hand painted with a French graphic
and again my red roses.

 
This pair of Ice Skates was painted with Old White
Chalk Paint and a winter scene on each.
I added white ribbon laces
and boa trim around the ankle.
And, of course lots of glitter~


Thank you for stopping by.
Hope you have a great weekend.
 
See you soon.
 
Celestina Marie
p.s. all the tubs of Christmas treasures you saw in my last post,
they are empty!!
 
from the Craft Room. 

Continue Reading
40 comments
Share:

Thursday, September 2, 2010

The Last Rose Of Summer

Celebrated by "SHOPPING WITH A TWIST" from, Make Mine Pink.
Happy September my friends. Today we are back to Friday shopping and the theme is "The Last Rose of Summer". I have been extremely busy already this season in the studio and enjoying full days of swinging a paint brush, glittering, gluing, styling and just fun creating. For today's Shopping with a Twist, Click HERE to visit my Friday offerings with Make Mine Pink. While there, stop over and visit the many other boutiques with pretty treasures with our theme.

Here are just a few new treasures for our themed shopping today.


The pumpkins are back and styling in light pink and a few traditional on the way too.
Some already off to good homes and others waiting for a special spot in a dear cottage. These can be found in my etsy shoppe.


Lastly, I wanted to share my newest baby shoe pincushion in my etsy shoppe.


Thank you for stopping by Friday shopping with a twist with themed treasures. I hope wherever you are, you also are enjoying The Last Rose of Summer.


Have a wonderful September day.
Blessings always, Celestina Marie

Continue Reading
24 comments
Share:

Sunday, August 2, 2009

I Do Windows!

Painting windows that is. Well, I have been known to wash a few windows in my time too. But painting is lots more fun, then washing windows. Recently I found a great large vintage window at one of my favorite antique malls. This old window was exactly what I have been searching for to complete my backyard area beside the potting bench. The bench needed something to balance out my little corner for gardening. After much thought and brainstorming, an old window with a flower box was the answer.


First I cleaned it well.

Washing the glass really good.

Then I painted the frame and inside wood the pretty green used on the potting bench.


Next the real fun begins. How do you like how it turned out? I painted the background a soft sky with light clouds, added a vine of pink roses with a sweet bluebird perched on a branch to keep me company when I garden.


Then is was my dear hubby's turn to make a flower box for under the window. I added purslane in 6 pots which fit the box nicely. I want to be able to change the flowers with the seasons. I used a plate to scallop the edge before he cut out the wood front. Again, painted it the same soft green. To the front, we found an iron garden sign at Hobby Lobby for $1.20 at the end of the season sale. This addition seemed to finish it off nicely coordinating with the rose arch in the same iron color.

Now you know one thing leads to another, right? So over the bench I needed a sign. Hubby measured and scalloped a nice sign board that I then stenciled GAREN CHIC over the pretty soft green. Now I think it's done.
To do the stenciling, I make a pattern first for placement. Mark where the letters will go and then use my stencil to follow and paint the letters.


The finished project hung on the brick. Turned out to be a cozy garden spot.


Lastly, I worked on an old chair for my studio. I purchased this great find for 15 dollars (SCORE) at the same antique market. The seat can be changed when I tire of the fabric as I sometimes do, but for now this works nicely.
Before and After~~~~


Okay, look at that chair back. Looks like a nice surface to paint and decorate. Should I leave it or paint it? AHH~~ what do you think I will do? LOL!!!

Of course, paint it!!! Added some roses and a stencil in the center. Now that's better.


Now it's on to more redos and redesigns for my etsy boutique. Thank you for stopping by. See you next time. Blessings, Bluebirds and Blue Skies be yours, Celestina Marie

Continue Reading
44 comments
Share: